About me 自己紹介

Frayed fabric flower ponytail holder tutorial 布花のヘアゴム作り方


If you're like me, you probably have piles and piles of fabric scraps left in your sewing room, which just seems to grow bigger and bigger...

Then, why not make a frayed fabric flower ponytail holder using your scraps? It will make your scrap piles a bit smaller... hopefully!

It's a quick project, which will probably take about 30 minutes to make one .  Everything is handstitched so you don't even need a sewing machine.

Okay, let's get going.  Here is the tutorial!


What you need:

  • One rectangle 3" x 8" of fabric scrap (I used light weight denim.  Cut it in bias* only if you want to minimize fraying.)
  • One rectangle 3″ x 8" of another fabric scrap (I used cotton seer sucker in pink check)
  • ponytail holder
  • needle and matching thread
  • a pair of scissors
  • embroidery floss (optional)
*NOTE: The petals of this fabric flowers will fray.  If you want to minimize fraying, cut the rectangles in bias, as I did here for the denim fabric.


Directions:

1. Begin with making the inner petals.  Select which fabric you would like to use for the inner petals, and fold the fabric rectangle in half like this.


2.  Using the below picture as a guide, begin cutting the bottom "loop" part with approximately 1/4 inch intervals using a pair of scissors.  Leave the top edge uncut approximately 1/2 inch from the top.


3. Using big stitches, start a running stitch along the top, about 1/4" from the top edge.


4. Pull the thread and sew both ends together.


5.  Pinch the needle in the middle and stitch through several times to secure all the layers.


6. Repeat for the outer petals.


7.  Pull the thread and place the outer petals around the inner petals like this.  Secure all the layers by stitching through all sides of the flower several times.   Be careful not to poke your fingers with a needle (ouch!), as you are stitching through several layers of fabrics here!


8.  Using few strands of embroidery floss (optional), attach the ponytail holder by stitching.

Back side will look like this


9.  Now you have one pretty fabric flower ponytail holder completed :)


This one I made with scraps of linen and lace fabrics.  I love the natural look!


You can also make this fabric flower into a flower corsage by adding dangling pieces of rick rack tapes, ribbons and lace and attaching a pin instead of ponytail holder in the back.

Hope you enjoyed the tutorial and let me know if you make one for yourself ;)


Also featured at:


*** This tutorial is for personal use only please!! ***

Cross stitching...


... for the first time in my life.

Cross stitching looked a bit intimidating at first, but I was wrong.   I think it was a lot more simple than (regular) embroidering, and it was such a soothing act to handstitch many many "x"s using a needle and thread.

I stitched on to this cross stitching tape that I got from my friend.
She was generous enough to give me more than 2 yards of this beautiful tape.
Thank you, friend!


The cross stitch designs are from this Japanese embroidery book.

"Small Embroidery from Scandinavia"
ISBN-10: 4834728021
ISBN-13: 978-4834728026


Now, I need to decide what to make from this small cross stitched project.


Whether it be a small sachet or a pincushion?  Or even a small bag...
We'll see!


Crocheted coaster


This is what I made last night after the kids went to bed.

A crocheted coaster made of pink and white cotton yarns.  Light blue cotton yarn is used for the edging.


I love green tea, and I drink at least three cups of green tea a day (and I almost never drink coffee).

I am going to use this coaster when I have another cup of tea :)

Hope you have a good weekend!


Aloha print water bottle holder


Today, I'd like to show you the aloha print water bottle holder that I made for my 8 year old daughter.  The fabrics used are chosen by my girl.


Hawaiian inspired fabric (from Japan)


You may recall that earlier this summer, I made this handmade water bottle holder for my 10 year old daughter. 

After making one for my 10 year old, of course, I had to make another one for my 8 year old, too. 
The sibling rivalry is pretty tense in this household, so everything has to be "fair" around here, which often drives mama nuts by the way...!


Made for my 10 year old earlier


Once again, I lightly followed the instructions from this Japanese sewing book.

Book title : Small Patchwork from Squares, Triangles, and Rounds
Publisher : Ondori-sha
ISBN-13: 978-4277490405
ISBN-10: 4277490409


The round bottom was a bit tricky to sew...
(Excuse me that I erased the name on daughter's name tag in the center ;)


Inside is all PINK!  And the bias tape is used to cover the raw edges around the opening.


Lately, it's starting to feel like beginning of summer here in Southern California, instead of the end of summer, with heat waves kicking in this week.  (It has been a really cool summer so far). 

The mama want her girls to be drinking plenty of water in this kind of weather, especially when they are at camps during the day ;)


Thanks for reading and hope you're enjoy your summer days!


Fabric tray tutorial 布トレイ作りかた


Few of my blog readers asked me to do a tutorial on my projects that I made so far, so I decided to give it a try today...  A fabric tray tutorial :)

I'll do my best to be clear and precise, but if any of the instructions are not clear enough, just let me know.  After all, this is still my second  sewing tutorial ever in my whole 40 something life...   Ha ha!

Okay, here we begin!


What you need:


  • One rectangle 10.5″ x 8.5" in main fabric (I used Japanese print)
  • One rectangle 10.5″ x 8.5" in backing fabric (I used linen)
  • One rectangle 10.5″ x 8.5" of your preferred batting (cotton, fleece, etc. I used regular fleece here)
  • Several strands of embroidery floss
  • Spray adhesive (optional, only if you are using non-adhesive batting like me)
  • Ruler and a marking pencil
  • Sewing machine

Directions:

1. Fuse the batting to the back side of the main fabric (outer fabric) with iron, or if you are using non-adhesive batting like me, use spray adhesive to glue the batting (fleece shown here) to the back side of the main fabric.


2.  Then, lay the main fabric and the backing fabric with WRONG sides facing, then sandwich the batting in between the main fabric and the backing fabric. 


3. Pin all four sides securely.


4.  Set your sewing machine to the zig zag stitch.  Try to make the space between each zig zag as narrow as possible.   


5. Begin sewing all four edges of the three layers of rectangles with zig zag stitch.  If you have a overlocker, rolled hem stitches work great, too.


6. After you've sewn all four edges, flip the rectangle over to the back side.  Using a ruler and a marking pencil,  draw four lines  1.25 inches from each sides.


7. Using your sewing machine, sew the inner rectangle, based on the lines you just drew with the marking pencil.


8.  Flip over the rectangle to the main side and squeeze one corner like this.


9. Using few strands of embroidery floss, handstitch the corners together along the stitching lines.    Use the the marked lines of both sides as a guide.   Repeat all corners.


10.  Tada!  It's done!


These fabric trays can be made into any shape.  For instance, I've made a tray to fit our kids' playing cards like this before.


The fabric tray will be a good place to keep your eye glasses and accessories, too...


Or, for another option, instead of sewing together all corners, you can apply snaps to make a fabric tray that lays flat when not in use. 

This beautifully patchworked tray is handmade by my dear blog friend, Sunnysidey, who was generous enough to kindly sew this up and  ship it to me from Aussie as a gift!  As you can see, she attached snap buttons on all four corners of the tray.


 Snap buttons applied at one corner

(Sam, to this day, I use your tray almost everyday at my sewing table! Thanks for the wonderful gift ;)


Well, if you happen to make fabric trays from this tutorial, please let me know.  I'd be thrilled to see yours!!  Thanks for reading and hope you all have a great weekend :)


*** This tutorial is for personal use only please!! ***


Cool summer & the crochet + fabric drawstring bag


Hello, my fellow crafters and bloggers!

It took a few extra weeks for our sunflowers to bloom this year, because of the strangely cool summer that we've been experiencing here in Southern California.  In fact, it has been downright cold, especially at night and early morning (going down as low as 60 F, or around 15 C) in August!

But the weather is finally starting to warm up this week, which is wonderful.


Anyways... here is something that I've made recently. 
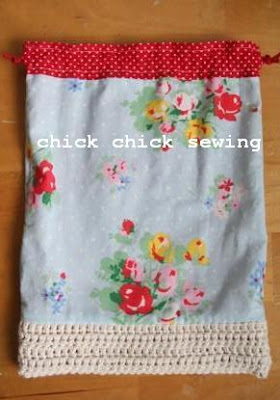
Crochet + fabric drawstring bag.


The pale blue floral fabric (my favorite) is used for the outer bag.

I purchased this fabric online as Cath Kidston fabric, but I'm not sure if it's a genuine Cath fabric or not... because it arrived from Asia, and not from England!  lol


Inner bag and the bag opening area is red/white polka dots.


And the bag bottom is made of crocheted piece.

I simply started with 40 chains, then double crocheted ten rows of cotton yarn to make this patch.  Then I "sewed" the crocheted piece together with other fabrics with the sewing machine, as I normally do with making any other bags.

Image of the crocheted piece.  Sorry, it's a bit wonky!


This drawstring bag is a perfect size to carry many of the necessities...


I love to crochet and I love to sew, so this bag is a great combination of two of my favorite crafting activities :)


Thanks for reading, and hope you continue to enjoy your summer days!