Making yarn wreath in autumn colors


Here in Southern California where I live, we had steaming hot days over a couple of days last week, with temperatures reaching as high as 100F or 38C in October, which is above 20F above normal weather! (And even hotter in some areas...) 

In a weather like this, not so many people are feeling *autumn* around here yet (how could we?), but I still managed to make this yarn wreath with my sweaty hands... lol :D


Do you remember this fabric wreath tutorial that I shared last holiday season?


Well, this time, I wanted to try something new, so I followed this tutorial to make a yarn wreath with felt flowers.   

These are the supplies used: a yarn ball, few sheets of felts, straw wreath, and a glue gun (not shown).


This wreath requires no sewing, yet the end result is beautiful!


Fortunately, the weather is treating us better for the past few days (no more boiling temperatures!)


Whether you live in a hot weather or a chilly one, you may want to try making one of these yarn wreaths for your home.  It's fun, quick, and addictive! 


Matryoshka love


I don't know why, but I love Russian matryoshka dolls so much.  Especially the fabrics!!

 I just listed these large zipper pouches in my etsy shop, in three different colors, which are made of my favorite matryoshka and dala horse fabric.  These are corduroy print fabrics imported from Japan.


The zipper pouches has flat bottom which adds more room to the pouch.   Small wood beads are attached to the zipper pull.


Because these pouches are fully padded with fleece batting, they're safe enough to carry small gadgets such as cell phones and digital cameras inside.


Just to tell you how much I love matryoshka prints, I'd like to show you some of my other handmade items made of matryoshka prints...


This one is a reversible everyday tote bag, featuring large matryoshka dolls and mushrooms.  This fabric is also a Japanese import.


The reversible side looks like this... Can you see the tiny matryoshka tape tag attached to the side of the pocket?   This bag has been already sold in my shop (thank you!), but I may relist it in my shop because I personally loved it so much :)


Here's another handmade item of mine made of matryoshka prints, also imported from Japan.  This item is currently listed in my shop.


In the past years, I remember making few other items featuring matryoshka, such as these fabric covered button magnets. 

Aren't they adorable??? 


And you may also recall these sachets, too.   Sometime ago, I made these lavender sachets using my hand carved eraser stamp of matryoshka doll.  Here's the post about these.


Maybe I was a Russian in my past life... Or maybe I was just a nesting doll collector... lol.  No matter what it is, my love of matryoshka does not seem to stop!


Happy matryoshka and happy sewing!   Hope you continue to enjoy your week :)


My first amigurumi


Hello my dear blog friends and crafters :) 

Today, I'd like to introduce to you this little amigurumi guy!
As you may already know, ami-gu-ru-mi (編みぐるみ)is a Japanese term for a crocheted or knitted stuffed toy.   This one is a crocheted version made by me.


 To make amigurumi, I had to begin by first crocheting these small body parts... a pair of hands, feet, and ears, as well as the large head, body, and an oval shaped mouth area. 


I then stuffed each body part with a poly stuffing.


The body parts are joined...  But he has no face yet (scary, huh?)


BTW, to make this amigurumi, I basically followed this Japanese book to make this bear guy.

ISBN-10: 4834729443
ISBN-13: 978-4834729443


Images from the book.  Teddy bears and friends...


Cute pigs and meerkats...


A cat relaxing with his friend...


Finally, creating his face was the fun part :)  I got his eyes from our local Joann store, and I carefully handstitched his nose and mouth.  

With his new face, now he came to life!!  Doesn't he look happy??


And here's a message from my little guy...


Happy crocheting and happy amigurumi making!
 Hope you have a relaxing weekend filled with crafty moments...

***Love, amy***


Patchwork mini zipper pouches in my shop


I just listed eight different designs of these zakka style mini zipper pouches in my etsy shop.  I patchworked pieces of small fabrics to make one of a kind pouches.  I enjoyed mixing and matching fabric bits to make my original creations :)


The width of the pouch at the opening is approximately 5 inches or 12.5 cm.  
The length is 4.5 inches or 11.5 cm.


It has a flat bottom.  The depth is approximately 1.5 inches (3.8 cm).


The pouch is safe enough to carry gadgets such as digital camera, as it is fully padded with fleece batting.


  Matryoshka, linen, and gingham check combination.


The wood bead is attached to the zipper pull with cotton cord.  These attachments to the zipper pull not only adds that special touch to the pouch, but it also makes it easier to open/close the zipper.


These mini pouches are perfect to be used as coin purse, credit card holders, cosmetics pouch, etc..


This one is a combination of Kaffe Fassett "floating flowers" fabric and polka dots cotton in a light blue tone.


Echino bird in yellow and 100% linen patchworked together here. 


Which one is your favorite?


Crocheting a small bag


I crocheted a small bag, using a gold sparkly yarn, which is one of my favorites.
Would you like to know how small the bag is?


Well, as you can see, it's so small that it can sit on my palm like this!


Here, I attached a chain to the *tiny* bag to make it into a necklace...


Or I can shorten the chain and hang it to my handbag like this.


This morning, I noticed that tomorrow is the last day of September, and I overheard our girls talking about what they want to be for this year's Halloween (October 31).   And I'm thinking... it's Halloween already?  Then comes Thanksgiving, Christmas, and New Year... OMG I'm feeling old again (lol)...

Well, I am going to enjoy my autumn days with more crafty moments (hopefully) before we hit that  holiday rush again this year.  Good bye September, and hello October.  Hope you treat me kindly ;)


Handmade kitchen scrubbie with a ribbon


For a quick project, I crocheted a square shaped kitchen scrubbie using 100% acrylic yarn from my yarn stock.   I've made a couple of these scrubbies in the past , in different shapes and colors, and I find them very useful, eco-friendly, and gentle on my hands, when I do the dishes.  BTW it's machine washable and dryer safe.

Of course I still use the ordinary detergents and a kitchen sponge when I clean greasy dishes or after I cut meat, poultry, fish, etc., but for non-greasy dishes, cups, and utensils, these kitchen scrubbies do the job just fine.  These acrylic scrubbies work just like microfibers so in most cases, they make the dishes and glasses even shinier.


The size of this scrubbie is approximately 5 " x 5 ", or 12.5 cm x 12.5 cm.   I did not follow any pattern to make this, I simply double crocheted several rows and then added a simple edging all around and a loop at the end.   Yes, I know that white ribbon at the corner of the scrubbie wasn't really necessary, but I just wanted to add a little cuteness to our kitchen sink... ;)


I will hang this scrubbie like this at our sink.

Happy crocheting and happy dish washing!  ...Well, hopefully ;)


Handmade room slippers


I made a new pair of room slippers for myself.  
I have cold feet (and hands), and I wear socks and/or room slippers throughout the year when I'm home.


To prevent from slipping, the back sides of the slipper soles are made of synthetic leather, which are machine washable.


The slipper exterior is made of 100% linen (navy blue).  For the lining,  I used 100% cotton double gauze fabric (roses on pale blue) which makes it very comfy to slip my feet inside!


Inside out of the slippers looks like this.     You really can't tell from the image, but for the sole part, there are two layers of fleece batting sandwiched between the double gauze lining and the synthetic leather sole  (which makes it a total of four layers).


I used slippers pattern from this Japanese craft magazine and made some minor adjustments.  The slipper size is approximately size 5-6 in U.S. women's sizes, or 23 cm - 24 cm in metric size, which fit me perfectly :)


Magazine Title: Cotton Friend  2011 Spring edition (vol. 38)

Publisher: Boutique-sha


Image from the magazine.


It was my first attempt to sew handmade slippers on my own, and boy, how it was challenging!!
I almost gave up during the process... but after several trial and errors, I was glad to be able to complete it. Phew...


Above, my slippers are worn by my older daughter, whose height and shoe sizes are almost identical as mine (and she's only eleven years old!)


Stitching for (another) baby


Hello my fellow crafty friends :)

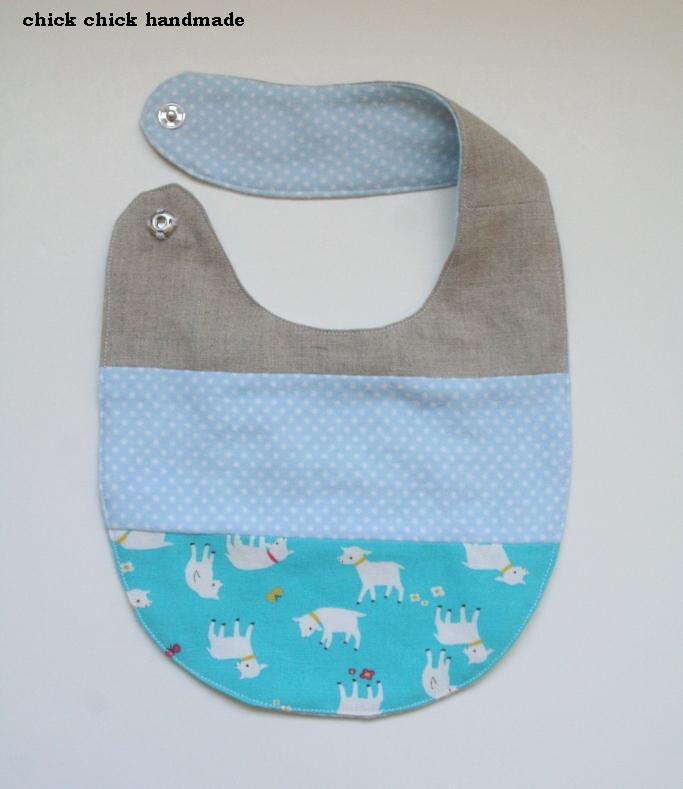
  Our girls' schools started last week and we are back to our full swing schedule.  I haven't had much time to sew lately, but I managed to stitch a special gift set for that special person...  Yes, another baby gift set created for our friend's baby boy.


As you may recall, I've already made two of the similar baby gift sets in the recent weeks, one for the baby Kaito (boy) and another for the baby Reina (girl).


This time, it's for baby William...  I handstitched his name using the chain stitch technique.


 I selected the fun goat prints on aqua blue as main fabric, and combined it with linen and polka dots flannel.


The drawstring bag and the bib are fully reversible.   Reversible side is super soft flannel in powder blue polka dots.


Once again, the reversible drawstring bag is made based on the awesome tutorial by Pink Penguin. 


Well, this handmade gift set for William is the last baby gift item on my list (for now)... I really enjoyed making stuff for babies, and I can't wait to make another one! 

Anyone expecting (lol)???


LinkWithin

Related Posts with Thumbnails