Showing posts with label tutorial. Show all posts

Sewing Patchwork Kimono Bags (and a quick tutorial on crazy patchwork) ♡ 着物地でパッチワークバッグ作り(クレージーパッチワーク縫い方も)♡


Using kimono fabrics, I stitched up patchwork purse for my hubby's elderly aunt who is in her late eighties. She lives in a residential care home in Honolulu, Hawaii.

ハワイ在住の高齢の夫の叔母(もうすぐ90才)に着物地を使ってパッチワークのバッグを作りました。 叔母はホノルル市内の住宅型高齢者ホームで暮らしています。


Here are the Japanese kimono fabrics/scraps I used to create this project. These kimono fabrics were received from my mom and my mom-in-law over the years. 

母と義母から譲り受けた着物地や着物地ハギレを活用してバッグを作ってみました。


Let me quickly show you how I stitched up the bag exterior panels using crazy quilting method. 

First cut out pentagon piece based on hard paper template (I used empty Hershey's ice cream box left on our kitchen floor to create this template. lol) Place pentagon piece slightly above the center of 10 1/2" square cotton batting. 

今回の着物パッチワークバッグは、クレージーパッチワーク(またはプレストキルト)というキルト芯に直接生地を縫い付けていく手法で作りました。すべての工程をミシンで行ったのでとってもスピーディーでした❣今日はその過程を簡単にご紹介しますね。

上の写真のようにまずは5角形の形に切ったピース(生地)を約26 cm大のキルト芯中央よりやや上の位置に配置します。(5角形の型紙はキッチンに転がっていたアイスクリームの箱を利用して切り抜きました。笑)


With right side facing down, align one strip of kimono strip onto one edge of pentagon. (I used 1 1/2 inch width strips for the first round but you can use strip of preferred width). Stitch at 1/4" seam allowance.

3.75 cm 幅のストリップ布(細長い布)と中央の5角形を中表に合わせて0.7 cm の縫い代で1辺を縫います。


Flip the strip over to the opposite side, so that the right side faces up. Press lightly.

縫い付けたストリップ布(細長い布)を表に返して軽くアイロンで押さえます。


Continue to add 1 1/2" width strips in clockwise (or counter clockwise, whichever you prefer) around the center pentagon in the same manner until all edges are covered with strips. 

このようにして順番に5角形のすべての辺にストリップ布を縫い付けていきます。1周目ができました。


Keep on adding strips to the second round. I used 2" width strips for the second round.

同様に2周目も5角形の周りにストリップ布を縫い付けていきます。2周目には 5 cm 幅のストリップ布を使いました。
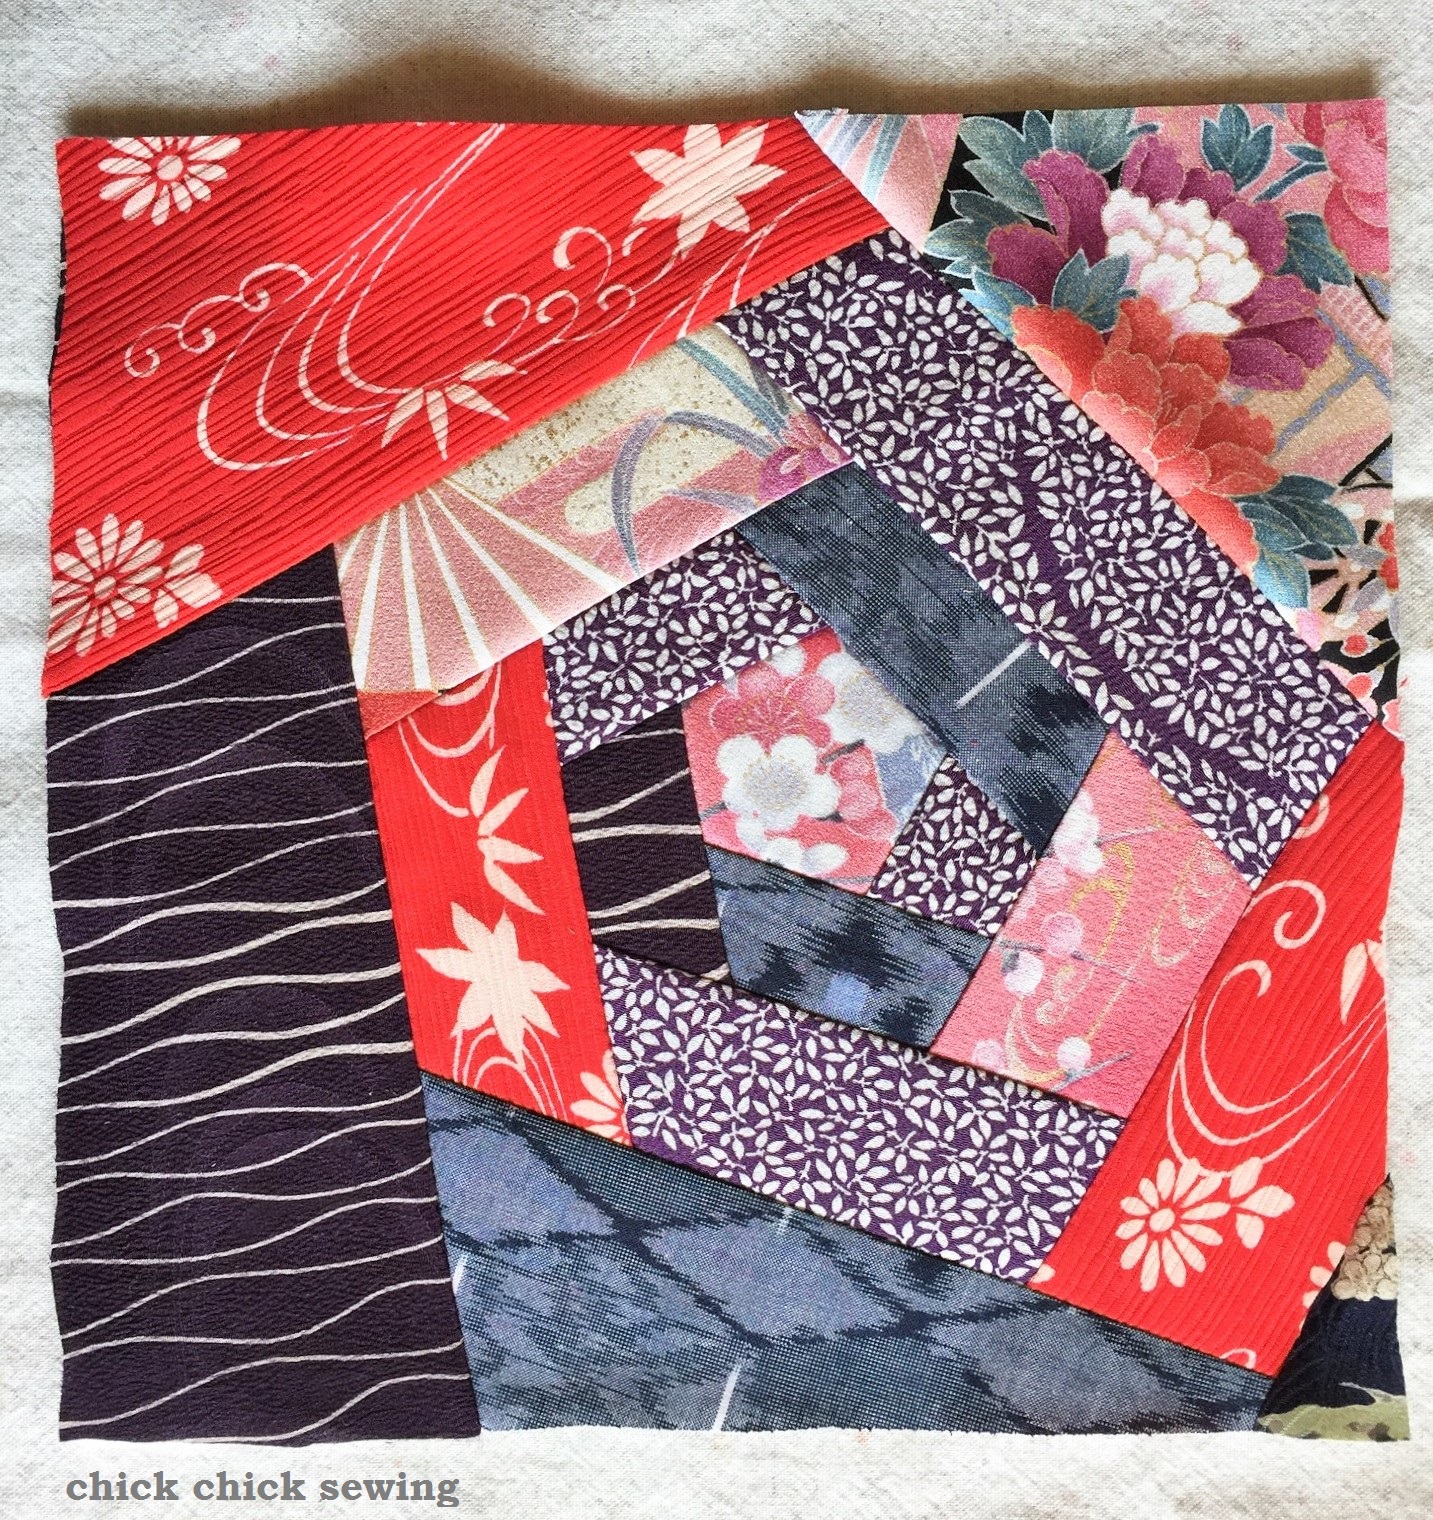


For the third and fourth round, I added strips of different width (bigger pieces). Continue until the batting is completely covered with fabrics. Square up the block to 10" square.

こんなふうにキルト芯全体が生地で覆われるまで同じ作業を続けます。御覧の通り、3周目、4周目には大き目の生地を使いました。出来上がったパッチワークを25 cm大に切り揃えます。
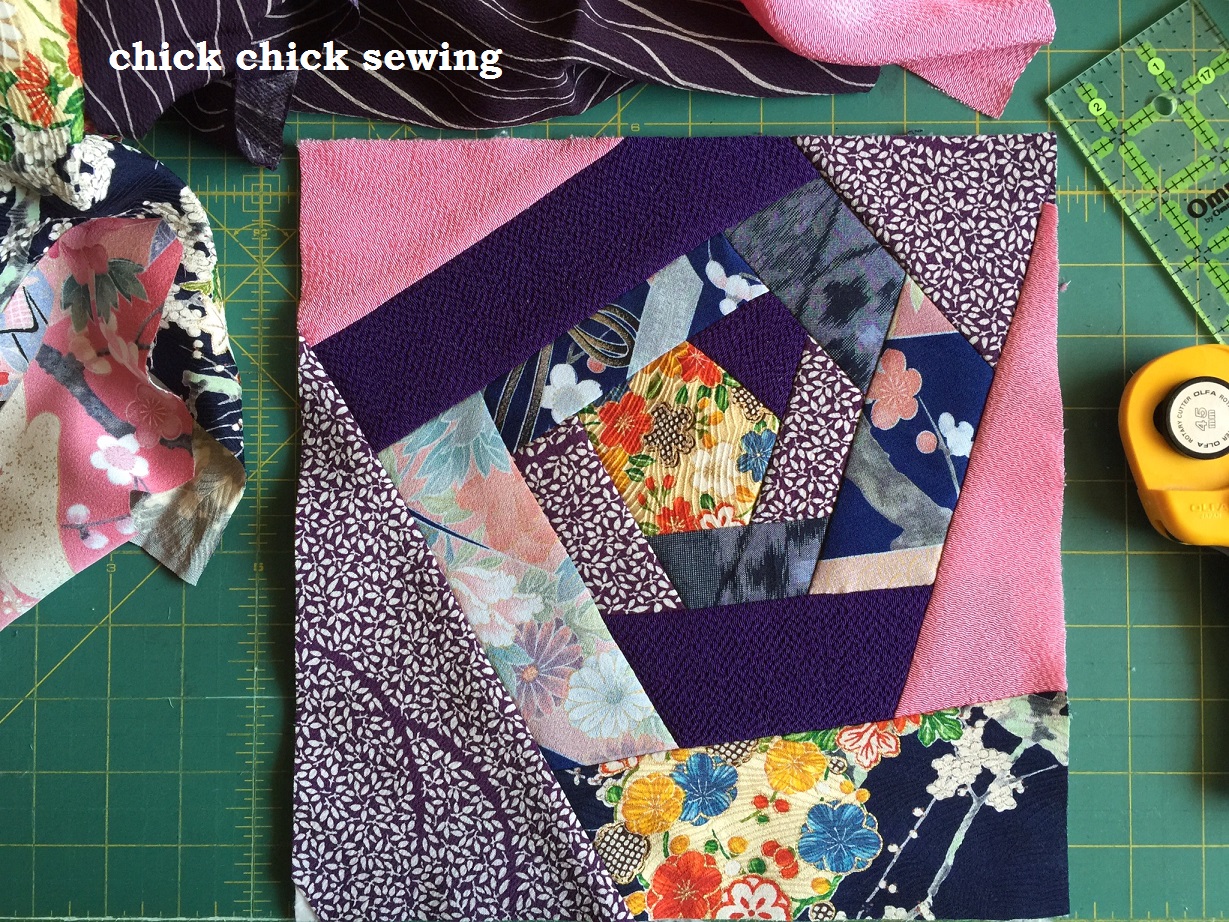


Here's the pink/navy version.  

こちららのパッチワークはピンクと紺色をメインにしてみました。


After finishing one zipper purse using the kimono patchwork block, I decided to make another one for the good friend of our aunty (total of two purses).

このような手順で着物パッチワーク布(表布)を仕上げた後、ファスナーを縫い付けてショルダーバッグに仕上げました。バッグを一つ仕上げてから、叔母の仲の良い友人用にも同じ形のバッグを作りました。(2つのバッグが出来上がりました)。


 Back side of the kimono patchwork bags.

後ろ側はこんな感じに。


From the moment I decided to stitch a purse gift for our aunty, cross-body purse was in my mind. I think cross-body is the most practical, safe, and convenient type of purse for the elderly woman, or for any of us! I used ready-made store-bought straps for these purses.


市販のバッグストラップを使っています。やはり高齢の叔母(とそのお友達には)このようなポシェットタイプのショルダーバッグが一番使いやすいのではないかと思いましたがどうでしょう。


Side view

横からみるとこんな感じ。


Inside pockets.

内側にはポケットを。


After making two kimono purses, one for our aunty and another for her good friend, I decided to make one more purse for another good friend of our aunty (total of three purses)! 

This purse is made for the kind Hawaiian lady who takes our aunty and her friend out for lunch on a regular basis. As you can see, I made this one bigger than the other two purses, to experiment with the size and style.

叔母と叔母の友人用にバッグを2つ仕上げてから・・・思い立ってもう一つバッグを作りました。(3つ目!)こちらのバッグは前の2点よりも少し大きめです。このバッグは、高齢の叔母と叔母の友人を定期的に食事に連れ出すなど日ごろから叔母達のことを気にかけて下さる心優しい知人の方へのプレゼントにすることにしました。


Back side of the bigger purse.

バッグ後ろ側には絣を使ってみました。


Three kimono patchwork purses finished! Phew!

どうにか着物地パッチワークバッグ3点の完成です。やれやれ💦


Yes it was quite a work to stitch three purses in a short period of time... but I had so much fun! My only wish is that the new owners make good use of these new purses! We'll see... Mahalo! (Or thank you in Hawaiian🌸)

短い期間に3つのバッグを仕上げるのは少々大変でしたが、何よりとっても楽しい作業でした~♥ ハワイ在住の叔母とその友人たちがこのバッグを使ってくれたら嬉しいな~、と願いをこめて…。マハロ~(ハワイ語でありがとう❣)

***Amy Morinaka***

Find me on Facebook (Amy Morinaka) →☆
Follow me on Instagram @chickchicksewing →★


Quilt-as-you-go scrappy star panels & My free patterns at Kokka-online site☆ Irome 生地を使ってミシンピーシング&kokka さんのサイトで無料レシピ公開中です☆


Hello everyone from Tokyo☆

This week I finished filing our taxes (yes it's that time of the year again) and guess what I did as soon as I finished them! I ran to my sewing machine and frantically began sewing like a maniac as always! lol 

今週は手間取っていた税金関係の仕事を片付けたので気分も軽くやっとゆっくりミシンで作業できました~


You see, sewing has been my best stress reliever (besides drinking...) and I know that it will always be!! 

やはり無心でミシンに向かってダダダ---っとソーイングする時間が私にとっては何よりのストレス解消法です。(ミシン以外では飲酒もストレス解消法ですが。ハハハ)


 I stitched up two panels of  quilt-as-you-go scrappy star panels mainly using Kokka's beautiful Irome fabric collection. 

今回は大好きなコッカさんの Irome (いろめ)シリーズの生地をメインに使ってミシンで気ままにストリップピーシング&ミシンキルティングしてみました。


The scrappy star used in these panels are made following my Scrappy Star Square bag pattern.

今回使った星のパターンは、私のオリジナル作品 Scrappy Star Square Bag (キラキラ星のキルトバッグ)から。


These panels measure 14" x 11" (35cm x 27.5 cm).  I can't wait to show you what these panels will turn into... soon!

それぞれ 35 cm x 27.5 cm 大のパネルが2枚仕上がりました。これで何ができるのかはお楽しみです♪


Speaking of my original patterns, free tutorials of my original patterns are available at Kokka-Fabric online site in Japanese!

さて、コッカさんのサイトでは私のオリジナルパターン2点の無料レシピを公開していただいています。レシピは日本語です。どちらもミシンで仕上げる手法を使っているので見た目よりずっとスピーディーに仕上がりますのでよければ御覧くださいね❣

Free patterns available at Kokka-online site:

Scrappy Star Square Bag (キラキラ星のキルトバッグ)→☆

Stella Dome Pouch (5つ星のバッグ)→★


If you are interested in English version of these patterns, they are available at my etsy shop.

これら2点のパターンの英語版は引き続き私のオンラインショップでも販売中です→☆


Happy sewing and have a stitchy kind of weekend my friends!♥♥♥

では皆さまも手作りタイム満載の素敵な週末をお過ごしくださいね❣


***Amy Morinaka***

Find me on Facebook (Amy Morinaka) →☆
Follow me on Instagram @chickchicksewing →★

Fabric Stuffed Christmas Tree Tutorial ☆彡布のミニクリスマスツリー作り方


Christmas is just around the corner and we still haven't set up our tree yet... 

In fact when we moved from California to Japan this spring, we got rid of our tree because we knew that we have no space to set up a big tree in our tiny apartment in Tokyo. So we actually don't have a tree to set it up... (sobs)


So what to do? I decided to make a quick holiday tree using what we have in abundance in our house... Money? No! Unfortunately! Fabrics? Yes, of course! lol

 So here's the tutorial if you decide to make a last minute mini Christmas tree for your family and friends. I know it's the craziest time of the year for everyone, so I promise I make it quick and simple! 

☆☆☆☆☆

今年もクリスマスまであと1週間。皆さんはもうクリスマスツリーは飾られたことと思います。我が家では今年の春にアメリカから日本に引越しをした際にこれまで使っていた大きなツリーを処分してしまったのでうちには今年は飾るツリーがないんです(くすん)。

そこで今回は我が家にたくさんあるもの(←お金!ではなく、布です~。笑)を使って手作りのツリーを作ってみることにしました❣ 作り方は簡単ですのでご自宅にツリーのある方もない方もぜひ作ってみて下さいね。


What you will need:(材料)

Fabrics, poly fill, and 20" ribbon trim
Craft glue is optional.

布、手芸綿、50 cm長さのリボン、工芸用ボンド(リボンのほつれどめに)


How to make stuffed fabric Christmas tree (作り方)
(Finished size: approx 7.5" or 19 cm tall でき上がりは高さ約19 cm)

1. First download tree template here

まずはこの型紙を印刷します→★

☆彡

2. Then cut out total of six pieces of tree patterns from your choice of fabrics - you may cut out trees from six different fabrics, or make it simple by using just one fabric. I used three different fabrics and cut out two tree patterns from each fabric (total of six tree patterns).

型紙をもとにお手持ちの生地から6枚のツリー型を切ります(型紙は縫い代込みです)。すべて同じ生地から6枚カットしても良いですし、または6種類すべて違う生地を使っても楽しいですね。私は3種類の生地からそれぞれ2枚のツリーを切りました(計6枚)。

Note: Only five tree patterns are shown above, but you should have six tree patterns in total

↑上の写真では5枚しかないですが実際には6枚カットしてくださいね。


3. With RST (right sides together), layer two prints together to make three sets of tree patterns. 

それぞれ2枚の生地を中表に合わせて3セットにまとめます。


4. Using 1/4" seam allowances, sew around the entire tree, leaving openings at the bottom. Make small cuts at "V" area as shown.

0.7cmの縫い代でまわりをぐるりと縫います。このとき、2ケ所縫わずに開けておきます。Vの部分に小さな切り込みを入れます。


5. Turn the tree right side out and push out corners. I like to use chopstick for this step (because we also have lots of chopsticks in our house!) but you may use a crochet hook, knitting needle, or any pointed object. Repeat for all three trees.

ツリーを表に返して角を出します。このとき、お箸、かぎ針、編み棒などを使うと便利ですね。3つのツリーすべて同様に行います。


6. Layer three trees on top of each other. Sew straight line at center, from top to bottom, through all layers of fabrics.

3枚のツリーを重ねて中心を真っすぐに縫います。


7. Begin stuffing tree with poly fill from openings at bottom. Be sure to stuff all points. After filling, close openings shut using small hand stitches.

ツリー下部の開き口から手芸綿を詰めます。角までしっかり綿を詰めるようにします。最後に開き口を縫い閉じます。


I used poly fill from local 100 yen store (dollar store). I ended up using one entire bag of poly fill (80 g or 3 oz) for this project.

私は近所の100円ショップの手芸綿をつかいました。今回はまるごと一袋使いきりました。


This is how it looks like after the poly fill is packed inside.

手芸綿を詰め終わったら底部分はこんな感じになります。


8. Make a bow using ribbon trim and attach it to the top of the tree using hand stitches. 

リボンを結んでツリーのトップ部分に縫い付けます。


9. Optional step: Dab a small amount of craft glue to both ends of trims to avoid frills. Let dry.

ほつれ止めに工芸用ボンドを少量つけて乾かします。


Your stuffed fabric Christmas tree is now complete! You may check out my Fabric Rag Wreath tutorial (blogpost) if you're interested in making the wreath  shown in below pic. 

布製ミニツリーの完成です♪ 写真のリースも手作りしてみたい❢という方はこちらの作り方→☆を参考にしてくださいね。布と発泡スチロールのリース型があればとても簡単にできるのでこちらもおすすめです^^


Now that the tree is done (sort of), I better start working on new year cards (we send each other new year cards in Japan instead of holiday cards)! Wishing you and your family the happiest time of the year from chilly and windy Tokyo☆彡

なんとかツリーが完成したのでお次は年賀状にとりかからねばです。海外生活が長かった我が家ではクリスマスカードに慣れてしまい、年賀状を書くのは約30年ぶりなのでいちいち緊張します(苦笑)。

では皆さま、お忙しい時期ですがご家族やお友達と元気な毎日をお過ごしくださいね。北風が冷たい東京よりAmyでした❢


***Amy Morinaka***

Find me on Facebook (Amy Morinaka) →☆
Follow me on Instagram @chickchicksewing →★


DIY Ironing Board Makeover ♪DIYアイロン台を張替えました♪


 It was about time to replace my old, stained, and burned ironing board cover to a new one. And you know what I mean if you see the below image...

最近、我が家のアイロン台カバーを張り替えました。これまで使っていたカバーはというと。。。


Ewwww yuck! 

ギャー!アイロンで焦がしたりシミがついたり、こんなに見るも無残なことになっていたのです~。


So I rummaged through my drawers to find my secret weapon: a staple gun!

というわけで私の秘密兵器、ステープルガン登場です。


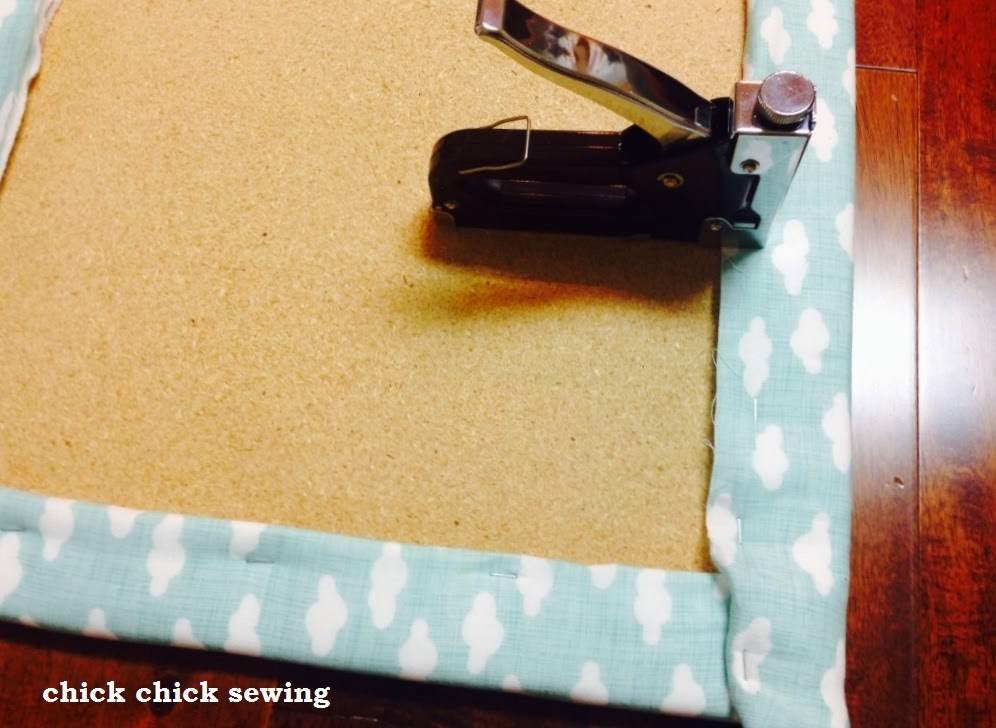
So here's how I put together my DIY ironing board.  I cover a thick cork board with layers of fabrics and batting in this order: upcycled fleece, insulated batting, and the exterior fabric. The cork board is cut to fit the "baby changing" surface of our chest. (We used the chest top when our girls were babies).

私のアイロン台はもともと市販のものではなく、なんちゃって DIY で自己流に作ったものです。作り方はいたって簡単。厚手のコルクボードに→使い古したフリース→保温保冷シート→表布(カバー用)コットン生地、の順に重ねているだけの簡単仕立てです。 ちなみにコルクボードは我が家の娘たちの赤ちゃん時代に活躍した、チェストの「おむつ交換台」部分にぴったりフィットするサイズです。


Carefully stretch all three layers taut. Use staple gun to hold all layers to the back side of the board like this.

3枚重ねの生地をしっかりと張り、ステープルガンを使って裏側に固定します。


Ta-da! I'm so happy with the outcome!

出来上がりです♪ 


Here's how my updated ironing area looks like in the corner of our kitchen/family room a.k.a. my crafting area!

我が家のキッチン&居間の隅っこに設置したアイロン台スペース。簡単リメイクできて満足です^^

***Love, Amy***


Find me on Facebook (Amy Morinaka) →☆
Follow me on Instagram @chickchicksewing →★

LinkWithin

Related Posts with Thumbnails